After years of being aware of the Home Assistant, it was finally time to give it a try! Two things that happened led to this experiment. In this story I will share my findings so far.
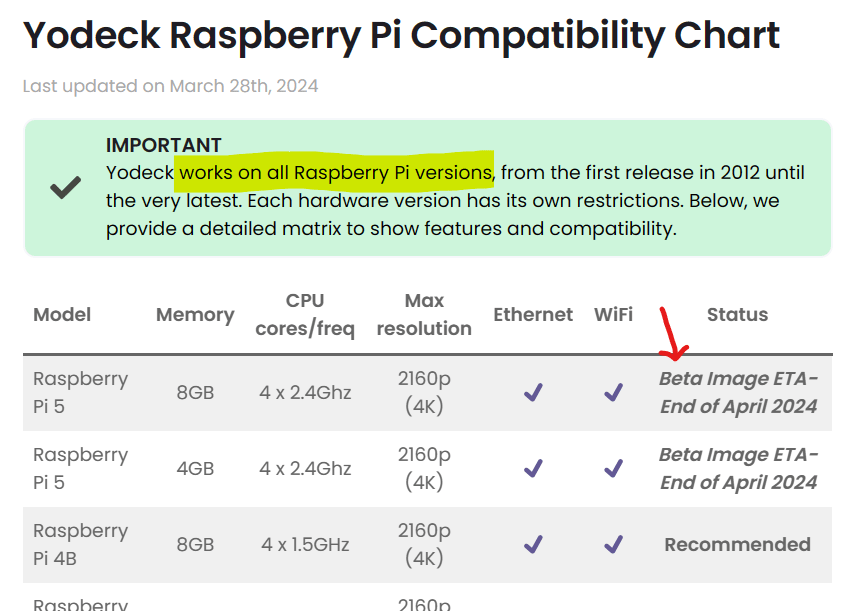
I have been driving my Infodisplay with an old Raspberry Pi 2B that was running Yodeck (Digital Signage Software). Then that Raspberry started to fail. I decided to upgrade to Raspberry Pi 5. My pre-check was a bit light and after changing the device I found out that Yodeck didn’t support Raspberry Pi 5 at that point. So I decided to do the implementation using plain Raspbian OS instead. The obvious benefit on this decision was that, after some years, I got again touch support for my Infodisplay (my display has touch functionality that was not supported by Yodeck).
Then one of my readers contacted me and we ended up having a lunch. What an inspiring discussion that was! After seeing some of his demonstrations of his setup, I was eager to upgrade my Infodisplay to allow user input in addition to presenting data.
Together these meant that I wanted to replace Grafana with Home Assistant as the primary interface. During the years I have read and heard much about Home Assistant. Now it was finally time to give it a try. I wondered for a while, if I should purchase some new Zigbee devices, mainly USB adapter to play with. This time I decided to use already available devices, meaning Ikea Trådfri set that I already had, one example of easy integrations.
So my initial target was formed as:
- Maintain Infodisplay power control by Ubiquiti security cameras motion detection
- Maintain (or improve) slideshow
- Show data I already have on the Grafana dashboard
- Enable user input
- Control slideshow
- Control lights, EV charging etc
- Show live feed from security cameras (mainly front door)

1. Raspbian OS kiosk mode
Raspbian has a good tutorial on how to use a Raspberry Pi in kiosk mode. I my case the problem was that my automation is shutting down the display regularly and with this combination of hardware, it caused the new Wayland based window manager to rearrange the windows every time the display got powered on. On the Raspbian forums, I found a discussion that helped me to force HDMI (audio?) device to appear asserted all the time. So I added “vc4.force_hotplug=1” to the end of the (only) line in “/boot/firmware/cmdline.txt” and the problem was solved after the next reboot!
I also ended up adding “–disable-pinch” to the Chromium kiosk mode parameters due to our kids that enjoy using the Infodisplay and playing with the zoom too often. This one I found from the List of Chromium Command Line Switches maintained by Peter Beverloo.
2. Wallpanel, photo slideshow screensaver
The community and usage base for Home Assistant is a great thing! There are a lots of integrations and modifications that are ready to be used. One example is Lovelace Wallpanel by Jan Schneider. It can be found from the Home Assistant Community Store (HACS). It provides pretty much all I have earlier been dreaming of for slideshow purposes and even more! Currently I’m using:
- URL based activation
- Hiding side and toolbars
- View based delay
- Forward/Backwards controls while in slideshow
- All the basics (nice transitions, shuffle…)
For easy editing and testing without wallpanel I have set it as “enabled: false” and I will trigger it on the Chromium kiosk by adding “?wp_enabled=true” to the end of the url. One thing to remember is to add that also to any navigation actions. I my case when I click the security camera card the Infodisplay will navigate to a another view with full screen view of the camera feed. Another click will return to home view.
3. Embedding Grafana panels as Lovelace Cards
To be able to embed Grafana panels I needed to enable anonymous access to Grafana and allow iframe embedding, I needed to edit the following in the grafana.ini. Without these the webpage card showed only the error “refused to connect”.
[auth.anonymous]

# enable anonymous access
enabled = true

org_role = Viewer

[security]

# set to true if you want to allow browsers to render Grafana in a <frame>, <iframe>, <embed> or <object>. default is false.
allow_embedding = true
4. Home Assistant anonymous access
Setting Home Assistant to allow anonymous access is well documented. How ever I found multiple forum threads having misunderstandings on this one. I set the following configuration to the configuration.yaml to allow my Infodisplay to login as specified user id based on the IP address of the Infodisplay:
homeassistant:
  auth_providers:
    - type: homeassistant
    - type: trusted_networks
      trusted_networks:
        ## endpoint/client device IP allowed to use this login method. CIDR notation, in my case /32, so only one IP
        - a.b.c.d/nn
      trusted_users:
        ### endpoint/client device IP: user id used for login. Can be one of the trusted networks or part of it. Can be one or multiple allowed userIDs. In my case the same (one) client as for trusted networks and only one user id.
        e.f.g.h: abc.....123
      ## with only one user id specified allows browser to access the main page directly
      allow_bypass_login: true
Next steps
Now it’s time to build a panel with the most used features using the features I have now tested to be functional. Couple of technical details remain on my todo list:
- Change to the camera view (and exit Wallpanel) based on the motion detection
- Replace my current WLAN and cloud based smart sockets with Zigbee based versions
- Control EV charging logic from the UI (means integration with Nodered)
So far Home Assistant seems promising!
